
DIY 3 fasers spændingsbeskytter Installation tips til anlægsledere
A 3 fasers spændingsbeskytter er en vigtig enhed for anlæg, der er afhængige af trefaset strøm, såsom fabrikker, lagerlokaler og store kommercielle bygninger. Det beskytter udstyr som motorer, kompressorer og tunge maskiner mod skadelige spændingsproblemer, herunder spids, fald, ubalancerede faser og fasetab, som alle kan forårsage dyre skader, nedetid eller endda sikkerhedshændelser. Selv om professionel installation altid er en mulighed, kan anlægsledere med grundlæggende elviden selv løse opgaven med omhyggelig planlægning. Nedenfor er der detaljerede tips til at sikre en sikker og vellykket DIY-installation.
Forstå grundreglerne for 3-faset strøm og beskytteren
Inden man begynder noget arbejde, er det afgørende at forstå, hvordan 3-fasekraft virker, og hvad en spændingsbeskytter det gør det.
Triefasedannelse er forskellig fra enkeltfasedannelse i hjemmet. Den bruger tre trådledninger (ofte mærket L1, L2, L3) og en neutral ledning, der leverer en konstant strøm af elektricitet, der er ideel til strøm-hungrende udstyr som industrielle motorer eller store HVAC-systemer. Spændingen i disse systemer varierer typisk fra 380 V til 415 V, hvilket er meget højere end husholdningsspændingen, hvilket gør sikkerheden til en topprioritet.
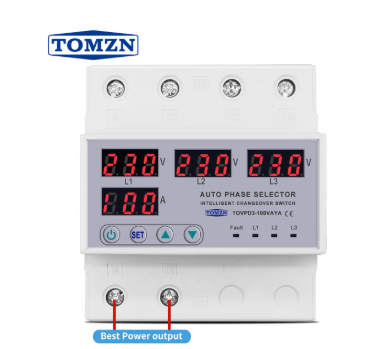
A 3 fasers spændingsbeskytter det er en stor udfordring for os. Den overvåger konstant spændingen i alle tre faser. Hvis spændingen stiger for højt (spike), falder for lavt (sag) eller bliver ubalanceret (en fase har betydeligt mere eller mindre spænding end de andre), lukker beskyttelsesapparatet strømmen til det tilslutte udstyr. Dette forhindrer overophedning, motorbrænding eller kredsløbsskade. Nogle avancerede modeller registrerer også faseforlust (når en af de tre trådledninger svigter) eller omvendt faseforløb (når de trådledninger er forbundet i forkert rækkefølge), hvilket begge kan ødelægge maskinerne.
For at vælge den rette beskytter skal du tjekke dens specifikationer:
- Spændingsområde : Den skal matche din anlægges strømforsyning (f.eks. 380V415V).
- Nuværende rating : Den bør være højere end den samlede strøm, som alle tilslutte anlæg trækker. Hvis maskinen for eksempel bruger 40 ampere, er en 50 ampere beskytter et sikkert valg.
- Funktioner : Bestem, om du har brug for fasetab eller omvendt fasesikring, som er afgørende for motordrevet udstyr.
Hvis man forstår disse grundlæggende principper, kan man vælge en beskytter, der passer til ens behov, og undgå fejl ved installationen.
Saml værktøj og sikkerhedsudstyr
Arbejde med 3-faset strøm er farligt på grund af den høje spænding, så det er ikke muligt at forhandle om at have de rette værktøjer og sikkerhedsudstyr.
Væsentlige værktøjer :
- Skrueskrabere (både fladhoved og Phillips) med isolerede håndtag.
- Trådstripper (for at fjerne isolering fra ledninger uden at beskadige metallet).
- Tænder (nåle-nose til stramme rum og almindelig til greb).
- En spændingsprøvesystem (for at kontrollere, om ledningerne er i drift; vælg et, der er beregnet til 500 V eller højere).
- En drejemomentnøgle (for at stramme forbindelserne til den korrekte stramhed, for at forhindre løs tråd).
- Kabelbindinger (til at fastgøre ledninger og holde dem organiserede).
Sikkerhedstøj :
- Isolerede handsker (med en effekt på mindst 1000 V til beskyttelse mod stød).
- Sikkerhedsbriller (til beskyttelse mod gnist eller skrald).
- Ikke- ledende sko (med gummisuller for at forhindre elektricitet i at strømme gennem kroppen).
- En hård hat (hvis man arbejder i områder med lave lofter eller faldfare).

Yderligere materialer :
- Elektrisk tape (til isolering af udsatte ledninger).
- Kabelstænger (metalforbindelser), hvis ledningerne er for tykke til at passe ind i beskyttelsesapparatets slutpunkter.
- Montering af udstyr (skrue, støtte) til at fastgøre beskyttelsesapparatet på en væg eller panel.
Inden man begynder, skal man kontrollere alle værktøjer: isolerede håndtag skal ikke være revnet, og spændingsprøven skal fungere (prøv den på et kendt strømforsyningsforløb, f.eks. et udtag i væggen).
Sluk for strøm og forbered installationsområdet
Arbejd aldrig med elektriske ledninger - selv en lille fejl kan forårsage alvorlige skader eller døden. Følg disse trin for at sikre, at strømmen er slukket:
- Find hoveddistributionsbordet her kommer 3-fasekraft ind i jeres anlæg. Den indeholder afbrydere eller sikringer til forskellige områder. Identificer den bryder, der styrer det udstyr, du ønsker at beskytte (mærkninger som Conveyor 1 eller Compressor bør være nyttige).
- Sluk for strømmen. : Vend hovedbryteren til "af"-position. Af hensyn til ekstra sikkerhed, sluk alle afbrydere i brættet. Lås hovedbryteren med en hængelås og placer et skilt i nærheden: TILSIG IKKE TIL ELEKTRISK OPTGANG. Dette forhindrer, at det ved et uheld aktiveres af kolleger.
- Kontroller, at strømmen er slukket. : Brug en spændingstester til at kontrollere faseledninger (L1, L2, L3) og neutrale ledninger i distributionsbrættet. Hvis testens sonder er knyttet til hver ledning, betyder det, at strømmen er slukket. Gentag denne test tre gange for at være sikker.
- Vælg beskyttelsesapparatets placering : Monter den tæt på distributionsbrættet eller det udstyr, den skal beskytte (kortere ledninger reducerer spændingstab og rod). Sørg for at området er tørt (ingen lækager eller fugtighed) og køligt (fra varmeapparater, kedler eller direkte sollys). Beskytteren skal være let tilgængelig ved fremtidige kontrollerundgå stramme hjørner eller høje hylder.
- Forbered monteringsfladen : Hvis det monteres på en væg, skal man rense området og markere, hvor skruerne skal være. Brug en bor til at grave huller, og sæt derefter anker i væggen hvis væggen er lavet af gips eller beton.
Forbind trådene korrekt
Fejl i ledningerne kan beskadige beskyttelsen eller udstyret eller få det til at svigte, når det er mest nødvendigt. Tag dig god tid og følg disse trin:
- Identificer ledningerne : I distributionsbrættet er de trefasede ledninger normalt brune, sorte og grå (eller røde, gule, blå i nogle regioner). Den neutrale tråd er blå eller hvid, og jordtråden (hvis den er til stede) er grøn eller gulgrøn.
- Afskærm og forbered ledninger : Brug trådstripper til at fjerne 1⁄2 tommer isolering fra enden af hver fase tråd, neutral tråd og jordtråd (hvis der anvendes). Vrid de udsatte kobberstråer tæt for at forhindre at de slidt.
- Monter beskyttelsesapparatet : Fastgør beskyttelsesapparatet på væggen eller panelet ved hjælp af monteringsmaterialet. Sikre, at det er på et sikkert niveau, så vibrationer fra maskinerne kan løsne skruerne over tid.
- Tilslut indgangsledninger : Beskytteren har input terminaler mærket L1, L2, L3 (for faseledninger) og N (for neutrale). Indsæt hver faseledning i den tilsvarende terminal (L1 til L1 osv.) og stram skruen med en drejningsmomentnøgle (følg manuelt s drejningsmomentindstillinger, normalt 2-3 Nm). Gentag med den neutrale ledning.
- Tilslut udgangstråler disse ledninger går fra beskyttelsesapparatet til udstyret. Beskytterens output terminaler er også mærket L1, L2, L3, N. Koble ledningerne fra udstyret til disse terminaler og stram dem sikkert.
- Anslut jordledningen (hvis relevant) : Hvis beskyttelsesapparatet har en jordterminal (mærket PE eller ), skal anlæggets jordledning fastgøres til den. Dette forhindrer elektrisk stød, hvis der er en fejl i beskyttelsesapparatet eller udstyret.
- Isolerede forbindelser : Bind elektrisk tape om hver ende for at dække alt metal der er udsat for stråling. Dette forhindrer utilsigtet kontakt med ledninger senere.
Test Installationen
Efter at have tilsluttet kablerne skal du teste beskyttelsesapparatet for at sikre, at det fungerer korrekt. Gå aldrig over dette trin.
- Tænd strømmen langsomt : Fjern hængelåsen fra hovedforbindelsen og vend den til on. Lyt efter usædvanlige lyde (sumsning eller klik kan betyde løs tråd).
- Kontrol af spændingsmålinger de fleste beskyttelsesanordninger har en skærm, der viser hver fases spænding. De skal være inden for det sikre område (f.eks. 380V415V). Hvis en fase er for høj eller for lav, skal strømmen slukkes og ledningerne kontrolleres.
- Prøvespændingsspids : Bed en kollega om kort at tilslutte en høj effekt enhed (som en generator) til at simulere en spids. Beskytteren skal straks slukke for strømmen til udstyret.
- Testfasestrategi : Sluk for en fasebryder i distributionsbrættet. Beskytteren skal opdage den manglende fase og afbryde strømmen, hvilket forhindrer udstyr i at køre i to faser, hvilket kan forbrænde motorerne.
- Test omvendt fase : Med strømmen slukket skal to fasekabler (f.eks. L1 og L2) udskiftes ved beskyttelsesapparatets indgang. Tænd strømmen igen beskytteren skal slukkes, da omvendte faser kan beskadige motorerne ved at få dem til at køre baglæns.
Hvis en af prøverne fejler, skal strømmen slukkes og ledningerne kontrolleres igen. Et almindeligt problem er løs forbindelse, stramme terminaler og genprøve.
Sikre ledninger og dokumentere installationen
Færdiggør arbejdet ved at organisere ledninger og holde optegnelser til fremtidig brug:
- Sikre løs tråd : Brug kabelsnør til at binde ledninger sammen, så de ikke kommer i kontakt med bevægelige dele (f.eks. ventilatorblad) eller varme overflader (f.eks. motorer). Det forhindrer skader og gør området pænt.
-
Mærk Alt : Brug tags eller markører til at mærke:
- Indgangs- og udgangsledninger (f.eks. Fra hovedkortet og til kompressoren).
- Beskytterens formål (f.eks. beskytter fas 1-maskiner).
- Installationsdato og navn (i tilfælde af at fremtidige hold skal stille spørgsmål).
- Opdatering af anlægspapirer : Tilføj beskyttelsesapparatets placering, ledningsdiagram og testresultater til din anlægs vedligeholdelsesjournal. Dette hjælper teknikerne med at løse problemer senere.
- Planlæg regelmæssige kontroller : I den første måned skal du tjekke beskyttelsesapparatet ugentligt for at sikre, at det viser den korrekte spænding. Efter det er månedlige checks nok. Rengør støv fra ventilationsåbningerne med en blød børste for at forhindre overophedning.
Ofte stillede spørgsmål
Hvordan ved jeg, om min 3 fasers spændingsbeskytter - Er det godt?
Kontroller, at skærmens spænding er inden for det sikre område. Testes ved at simulere en spids eller faseforlust (som beskrevet ovenfor). Hvis den slukker strømmen under testene, virker den.
Kan jeg installere en beskytter på et system med flere maskiner?
Ja, men sørg for, at beskyttelsesmaskinens nominelle strøm er højere end den samlede strøm fra alle maskiner. Hvis der f.eks. er tre maskiner, der hver bruger 20A, skal der anvendes en 70A-beskytter (for at tage højde for startspændinger).
Hvad kan forårsage en 3-fases spændingsbeskytter?
Løsforbindelser (overophedning og beskadigelse af komponenter), støvophobning (blokke, der forhindrer køling) eller lynfald (for stærke til at beskyttelsesmaskinen kan håndtere). Regelmæssig rengøring og strømforsyning (til lyn) hjælper til at forhindre dette.
Er det sikkert at røre beskyttelsesapparatet efter montering?
Ja, når den er installeret og tændt. Hylden er isoleret, men aldrig åbnet, mens strømmen er på.
Skal jeg have en professionel til at inspicere installationen?
Det er en god ide. Selv hvis du er sikker, kan en autoriseret elektriker kontrollere for skjulte problemer (f.eks. forkert drejningsmoment på tilslutninger), som kan forårsage problemer senere.
Indholdsfortegnelse
- Forstå grundreglerne for 3-faset strøm og beskytteren
- Saml værktøj og sikkerhedsudstyr
- Sluk for strøm og forbered installationsområdet
- Forbind trådene korrekt
- Test Installationen
- Sikre ledninger og dokumentere installationen
-
Ofte stillede spørgsmål
- Hvordan ved jeg, om min 3 fasers spændingsbeskytter - Er det godt?
- Kan jeg installere en beskytter på et system med flere maskiner?
- Hvad kan forårsage en 3-fases spændingsbeskytter?
- Er det sikkert at røre beskyttelsesapparatet efter montering?
- Skal jeg have en professionel til at inspicere installationen?